Your first Ship[]
In Rodina the ability to mod and create custom .egm files is possible with the use of Rodina's blender export plugin found in Rodina's Scripts folder labeled "BrendanExport.py"

This section of the wiki is Specific to the modding of the player ship. Important things to Consider when designing your first ship:
- Ship Shape affects interior space, leave enough room for character movement.
- Ship detail can affect overall performance (See High Detail Model Section)
- Ship requires an airdock for Exit/Entrance.
Keeping these things in mind while designing your ship will save you a lot of time in the future.
Ship Creation[]
General understanding of blender is needed but plenty of guides exist to help with learning the basics of blender.http://www.blender.org/support/tutorials/ You can also download Rodina assets and models from the Elliptic Games Site: http://elliptic-games.com/?page_id=491
As the export plugin is only for creating egm files making the ship from scratch is needed. the ship is made of 1 parent object and 4 sub objects. The Ship must also be created in 2 versions. 1 model with airdock open and one with airdock closed. structure of the object goes as follows:
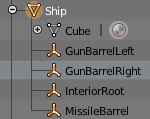

Interiorroot position at bottom of airdock edge.
all objects can be created from a mesh of your choosing but modeling is not important as object center point is actual particle spawn-point. gunbarrelleft, gunbarrelright, and missilebarrel can be placed anywhere on your ship and act as spawn-points of the weapons when used, where ever you place your gunbarrelleft, will be where one of your forward guns will fire from. The interiorroot however acts as the spawn-point for your airlock door and overall entrance to your ship. the scaling of this object will effect overall ship interior scale and may take time to find appropriate scaling . to large and you look small and it may not fit your ship models interior, too small and you may not be able to move in and out of your ship.
Positioning of the interior root object is the center-bottom the the airlock out door and should be positioned at the opening of your ship models entrance. scaling here may be trial and error and may require exporting your ship ,playing ingame, then adjusting multiple times.
Exporting Your Ship[]
To use the Exporter you must install the brendanexport.py plugin found in the Rodina/Scripts folder. Once your Plugin is installed you can goto file-export-export brendan(.egm). as said before your ship must be exported into 2 models:
- Ship1.Shipopen.egm --This model is for when your ship is parked and you are either in or out of the ships interior.
- Ship1.Ship.egm --This model is for when you are operating the ship in flight. and the ships dock space can be filled or bridged.
If using a high poly model, create a low poly version as well and make use of Method 2.
Method 1[]
For low detail models only!Both these models must be placed in Rodina/Data/Models and overwrite the originals( Remember to backup your originals incase you need them!!)
Method 2[]
When using a High Poly model it is important to make sure it is not used for the physics side. By default the game uses the same ship model for visual and game physics(collisions). This is fine with low poly models as it has less to calculate. If you are using a High poly model it is important to make a low poly collision model aswell. If you would like use a High Poly model, name the models anything you want and be placed into the Rodina/Data/Models folder. But you must Edit the model path in the EGDataShipplayer.lua file located in the Rodina/Scripts/DataGameplay folder.
Alter the names of these 2 paths:
EGShipPlayer.Path = "Ship1.Ship.egm" EGShipPlayer.PathParked = "Ship1.Shipopen.egm"
For the Collision model there is 2 paths aswell, 1 for flying and 1 for parked. Alter the Physics located slightly lower:
EGShipPlayer.VehiclePhysics=
{
FlyingBasis = "Ship1.Ship.egm",
ParkedBasis = "Ship1.Shipopen.egm",
Using a high poly model as the collision model may cause the game performance/loading issues and even crash.
Helpful Ship Fixes[]
Some times when getting your ship into game it can have rotation,scale, and Poly hole issues. Here is 2 fixes to these:
Pizza Holes in ship[]

This is caused by the game using tris instead of quads. if you select your mesh in blender(each one needs this done to it or they will have the problem individually) go into edit mode(default is tab) then select mesh->faces->Triangulate faces this will convert all quads to triangles and that should fix all holes. Also, another cause could be that your normals are messed up. To fix this, go to edit mode, select all, then select mesh->Normals->Recalculate Outside.
Ship pointing in weird angles in game[]
This is due to Blenders orientation during import. its super touchy and and strict. usually after import from 3ds or maya objects will be oriented different from blender. if you look on the right edge near the top of the view their should be a small plus sign. that pops out the rotation and scale settings. if you have your ship already oriented in the view the way it should be chances are the import to blender messed up the rotation and scale to be different from what the reference picture shows. if your all set on size and position click your parent object and in normal mode click object->Apply->Rotation and scale.
What you want is your Rotation to be all 0 and your Scale to be 1 or ingame your ship may be warped.
Ship Engine Position and Particles[]
all Particles are configured using lua files! the Color,Size,and position can be changed by modifying values in 2 specific lua files:
- Rodina/Scripts/DataGameplay/EgDataShipPlayer.lua
This is used to modify the ships Engine trail positions accurately.
- Rodina/Scripts/DataRender/EgDataParticles.lua
This is used to modify the Color,Size, and Amount of Particles from engines to weapons.
--------------------------------
EgDataShipPlayer
--------------------------------
As said before this is to modify your engine(dock,combat,cruise)
to position your particles its easiest to edit the enginepos in the EGDataShipPlayer.lua file. located in Scripts - > DataGameplay
heres an example:
local enginePos = EGVector(-6,-45,8)
the egvector is xyz positioning so think of it like
EGVector ([-Left / +Right] , [+Forwards / -Backwards] , [+Up / -Down])

using that you can manouver the engine spawn around on your model, probably going to have to load your game a few times just to tweak. now if you want multiple engines thats a bit more-
you can add engines by adding another enginePos, example:
local enginePos = EGVector(-6,-45,8)
local engine2Pos = EGVector(6,-45,8)
with this ive added a second engine position. and moved it to the opposite side of the ship. but to actualy make it generate particles. you have to add attach particles, find this around line 345 i think(mines been modded so ctrl-f should help you find it easier.
self.Engine:AttachParticles( "Engine Fire Effect", "CombatEngineMain", aForwardStrength, enginePos, backwardsDir )
to add your second engine just duplicate that line but make sure you change enginepos to whatever you named your second engine, AND change"engine fire effect" to whatever you want. but engine fire effect has to be different from the original or the particles wont spawn. so as an example
self.Engine:AttachParticles( "Engine Fire Effect", "CombatEngineMain", aForwardStrength, enginePos, backwardsDir )
self.Engine:AttachParticles( "Engine Fire Effect2", "CombatEngineMain", aForwardStrength, engine2Pos, backwardsDir )
The same should be done for the cruise engines particles( written immediately after the combat engines in the file.
--------------------------------
EgDataParticles
--------------------------------
This File Effects Particles all over Rodina and can be modified in many ways
to start here is an example of the cruise engine particle layout:
System.CreateParticleMaterial
{
	Name = "CruiseEngineMain",
	Loop = true,
	BlendStyle = "Add",
	--OrientationType = "EG_PARTICLE_ORIENTATION_WORLD_ROTATION",
	OrientationType = "EG_PARTICLE_ORIENTATION_LOCAL",
	Styles =
	{
		{
			Rate = 5000,
			Size = 50,
			Offset = EGVector( 0, -50, 0 ),
			VelocityBase = EGVector( 0, 400, 0 ),
			VelocityRange = EGVector( 30, 00, 30 ),
			VelocityNormalBase = 0,
			VelocityNormalRange = 0,
			Acceleration = EGVector( 0, 0, 0 ),
			AccelerationNormal = 0,
			Yaw = .02,
			Pitch = .02,

			Lifetime = .175,
			Keys =
			{
				{
					Color = EGVector( .05, .05, .15 ),
					Alpha = .8,
					Time = 0,
					Size = 1.5
				},
				{
					Color = EGVector( .05, .025, .2 ),
					Alpha = .5,
					Time = .5,
					Size = 1.0
				},
				{
					Color = EGVector( .0, .0 , .1 ),
					Alpha = 0,
					Time = 1,
					Size = .4
				}
			}
		}
	}
}
lets say you wanted to alter the color of your engine flames. this can be done by editing the color value in the keys. Each key is a timestamp from the life the particles telling the emitter what color,transparency, and time of life its at. here is an example:
{
	Color = EGVector( 1, 1, 0 ),
	Alpha = 1,
	Time = 0,
	Size = 1
},
Say you wanted to alter a color of the engine flames to red. You would change its color value to( 1, 0, 0 ). here is a quick reference to the colors to get you started:
|
WHITE |
1, 1, 1 |
|
RED |
1, 0, 0 |
|
GREEN |
0, 1, 0 |
|
BLUE |
0, 0, 1 |
|
BLACK |
0, 0, 0 |
These colors can be scaled between 1.0 and 0.0, so decimals are allowed. As an example this is Purple(0.694, 0.051, 0.788)